Deploy Sage 10 to Kinsta with Bitbucket pipelines
Using Trellis with Kinsta while convenient, was very slow. Also felt like an overkill since it's not needed to provision the server.
When I could no longer bear its everyday issues, I went in quest of a better alternative.
Since I already use Bitbucket, I decided to go with their pipelines to build and deploy Sage 10 to Kinsta. Along with Local by Flywheel as a faster localhost, but most importantly, allows the use of WP CLI with some extra configuration. Which allowed me to use a modified version of the sync script and wp commands from the cmd directly.
I'll go into deploying Sage 10 in this post and the sync script in the next one.
Setup and Goals
- I use a normal WordPress setup and do NOT use Bedrock. Therefore, the repository contains the theme only.
- When I
git pushI want the theme to get compiled and deployed to Kinsta's live or staging enviroment depending on the branch I pushed to. - I want the theme name to automatically be the same as the repository slug.
1. Enable Pipelines
You can do so by going to Repository Settings -> Pipelines -> Settings.
Note: You need an Admin access level to the repository for that.
2. Configure the Pipeline
Create a file with the name bitbucket-pipelines.yml and have it in the
repository's root. Which should also be the theme's root.
Then paste the below code into it.
options:
	max-time: 5

pipelines:
	branches:
		master:
			- step:
					name: Build yarn
					image: node:14.16.0
					caches:
						- node
					script:
						# Install npm dependencies
						- yarn
						# Compile assets for production
						- yarn build:production
					artifacts: # only accepts relative paths to $BITBUCKET_CLONE_DIR
						- public/**

			- step:
					name: Install Composer dependencies
					image: prooph/composer:7.3
					caches:
						- composer
					artifacts:
						- vendor/**
					script:
						- composer install --no-ansi --no-dev --no-interaction --no-progress
							--optimize-autoloader --no-scripts --classmap-authoritative

			- step:
					name: Deploy
					image: instrumentisto/rsync-ssh
					script:
						# Deploy repo with production assets
						- rsync --progress -avz --chmod=Du=rwx,Dg=rx,Do=rx,Fu=rw,Fg=r,Fo=r
							--delete -e "ssh -p $PORT_LIVE" $BITBUCKET_CLONE_DIR/*
							$USERNAME@$HOST:$REMOTE_DIR/wp-content/themes/$BITBUCKET_REPO_SLUG/

			- step:
					name: Clear Kinsta Cache
					image: curlimages/curl
					script:
						- curl $DOMAIN_LIVE/kinsta-clear-cache-all/
						- curl $DOMAIN_LIVE_KINSTA/kinsta-clear-cache-all/

		staging:
			- step:
					name: Build yarn
					image: node:14.16.0
					caches:
						- node
					script:
						# Install npm dependencies
						- yarn
						# Compile assets for production
						- yarn build:production
					artifacts: # only accepts relative paths to $BITBUCKET_CLONE_DIR
						- public/**

			- step:
					name: Install Composer dependencies
					image: prooph/composer:7.3
					caches:
						- composer
					artifacts:
						- vendor/**
					script:
						- composer install --no-ansi --no-dev --no-interaction --no-progress
							--optimize-autoloader --no-scripts --classmap-authoritative

			- step:
					name: Deploy
					image: instrumentisto/rsync-ssh
					script:
						# Deploy repo with production assets
						- rsync --progress -avz --chmod=Du=rwx,Dg=rx,Do=rx,Fu=rw,Fg=r,Fo=r
							--delete -e "ssh -p $PORT_STAGING" $BITBUCKET_CLONE_DIR/*
							$USERNAME@$HOST:$REMOTE_DIR/wp-content/themes/$BITBUCKET_REPO_SLUG/

			- step:
					name: Clear Kinsta Cache
					image: curlimages/curl
					script:
						- curl $DOMAIN_STAGING/kinsta-clear-cache-all/
3. Repository Variables
For the above pipeline to work, you'll need to provide the set the below repository variables via Repository Settings -> Pipelines -> Repository variables
REMOTE_DIR: Path in KinstaHOST: Host in KinstaUSERNAME: Username in KinstaPORT_LIVE: Port in KinstaPORT_STAGING: Staging enviroment's Port in KinstaDOMAIN_LIVE: Live website's domainDOMAIN_LIVE_KINSTA: Kinsta's domain that usually ends with.kinsta.cloudDOMAIN_STAGING: Kinsta's staging domain that usually starts withstaging-and ends with.kinsta.cloud
Which should look something like this:
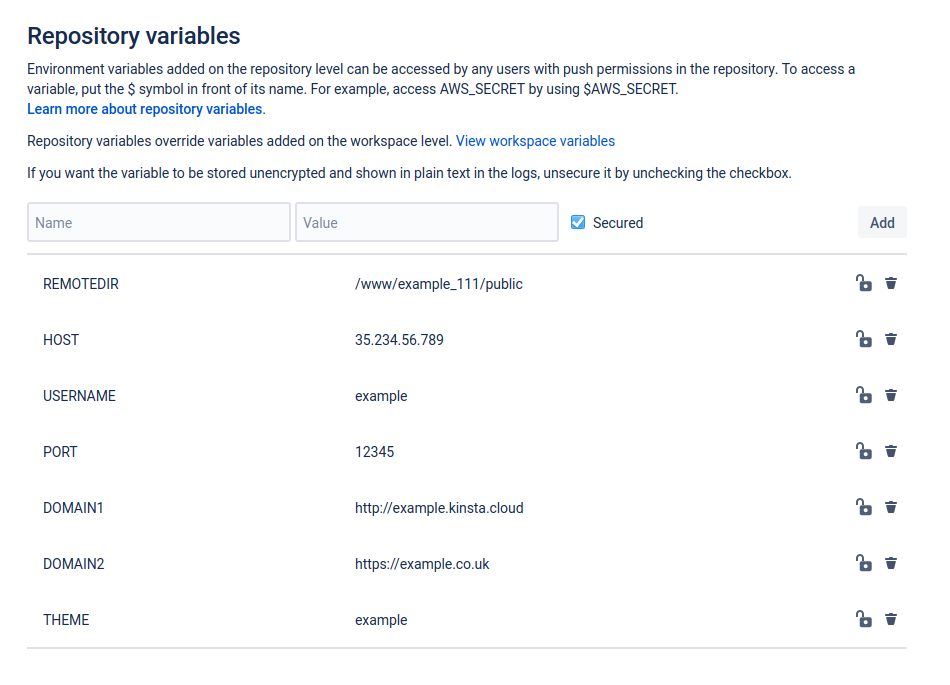
You can secure the values if you wish.
4. Granting Bitbucket SSH access to Kinsta
To enable the deploy via SSH, you'll need to click on Generate keys from Repository Settings -> Pipelines -> SSH keys
Then add the generated public key to Kinsta from User Settings -> My Account -> SSH keys
5. Adding Kinsta to known hosts
You'd also need to add both Kinsta's live and staging enviroments as a known
host in Bitbucket from the same page by adding the host and port in the
following format 35.234.56.789:12345 then clicking fetch.
Once you see the fingerprint, click Add host
Make sure you do so for with the staging port as well.
6. Deploy
From now, once you git push to the master branch, it'll deploy the theme to
Kinsta's live enviroment. When you git push to the staging branch, it'll
deploy to Kinsta's staging enviroment.
You can view the pipeline progress from Pipelines -> most recent pipeline
You should see something like that:

If yarn in the Build Yarn is taking more than 1 second, it means it's not
cached yet. When you Rerun the pipeline or git push again, it should use
the cache and be faster.
Final words
I hope that enhances your development speed now that you don't need to manually deploy the theme after pushing changes to the repository and be able to use a faster localhost.
If the above didn't work for you or you wish for me to expand on the why behind any of it, tweet at me. I'm very friendly.